Script source code file: sample/physics/main.lua
The goal of this tutorial is to show you
- the difference between rigid body and no rigid body
- the difference between static, kinematic and dynamic objects
- how to create objects with physical behavior
Basically, there are two different types of objects available. Objects with rigid body and objects without rigid body.
No rigid body
Objects with no rigid body are only rendered. They can be moved freely and they don’t cause any collision, thus other objects can move through them. These objects only use a minimum of the engine's performance. If you export a new object from Maya without having changed the attributes, the rigid body is activated by default. You should turn it off in the editor, when you don’t need it.
Rigid body
Objects with rigid body behave like real objects. If another object with rigid body tries to go trough it, there will be a collision. Since the used up power of this behavior has to be calculated, it should only be used when necessary. There are three rigid body types:
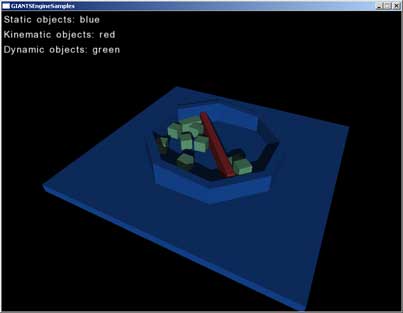
Static
These objects offer collision, but they can’t be moved, nor do they react to gravity.Kinematic
These objects offer collisions with dynamic objects and can be moved in a predefined way. E.g. if you have a train that goes from A to B along a predefined path and a collision occurs with a kinematic object, the train will simply continue its movement, while the dynamic object will be pushed away. If the same train hits a static or another kinematic object, nothing will happen.Dynamic
This kind of objects react dynamically to collisions and can't be moved manually. The movement of dynamic objects is a result of external forces and isn’t predefined.Run SamplePhysics.exe.
Since it is self-explanatory, just open the sceneWithPhysics.i3d which is located in /sample/physics to see how it is done.
You probably need to zoom out a bit to see the whole scene.
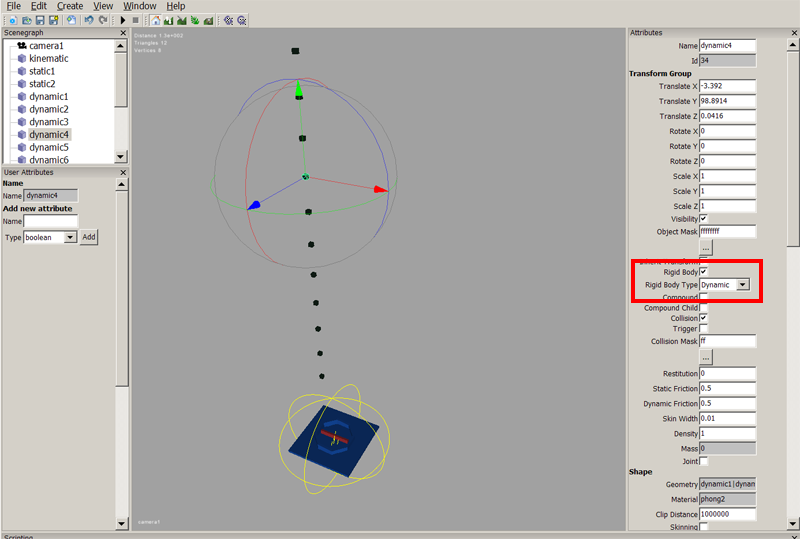
Select the different objects and look at the Rigid Body Type in the red marked area. In this scene all objects are rigid bodies, but the Rigid Body Type is different, depending on how their physics should react.
If you want to select a cube which is within the sphere of the multi-selection-tool, you’ll first have to select something that is a bit further away.
Try to change the Rigid Body Type of the different objects and see what happens, when you run the program. To change it, simply open the dropdown menu and select the desired Rigid Body Type. Hit enter, and don’t forget to save your scene.
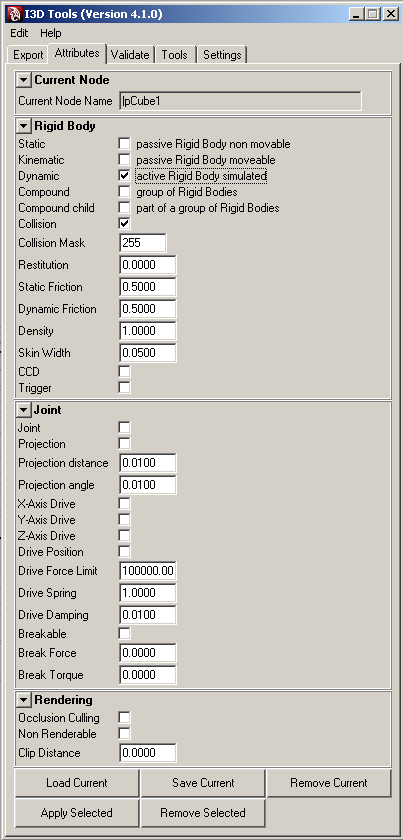
Instead of defining the physical behavior of an object in the editor, you could specify these settings directly in Maya. Launch the i3d exporter and open the attributes panel where you can see all the Rigid Body options available. Just select the desired mesh, click Load Current and then set the Rigid Body settings as you wish. Don’t forget to click Save Current when you've done it. If you export the mesh as an i3d file, the rigid body settings are already included. This method has the advantage that attributes defined in Maya remain in the saved scene file. If you export the same scene more than once, you might save time by defining it once in Maya instead of redoing it every time in the editor.